

how to create circle dinamically on canvas python with mouse
Usage
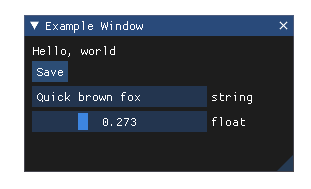
Dear PyGui provides a simple way for python developers to create quick and powerful GUIs for scripts. Dear PyGui consists of a program window, windows, and widgets. The program window is the main window of your program and is created at the end of the main python script by calling the function start_dearpygui().
Code:
          from dearpygui.core import *              def              save_callback(sender, data):
              print("Save Clicked")            add_text("Hello, world")
add_button("Save", callback=save_callback)
add_input_text("string", default_value="Quick brown fox")
add_slider_float("float", default_value=0.273, max_value=1)            start_dearpygui()
Result:
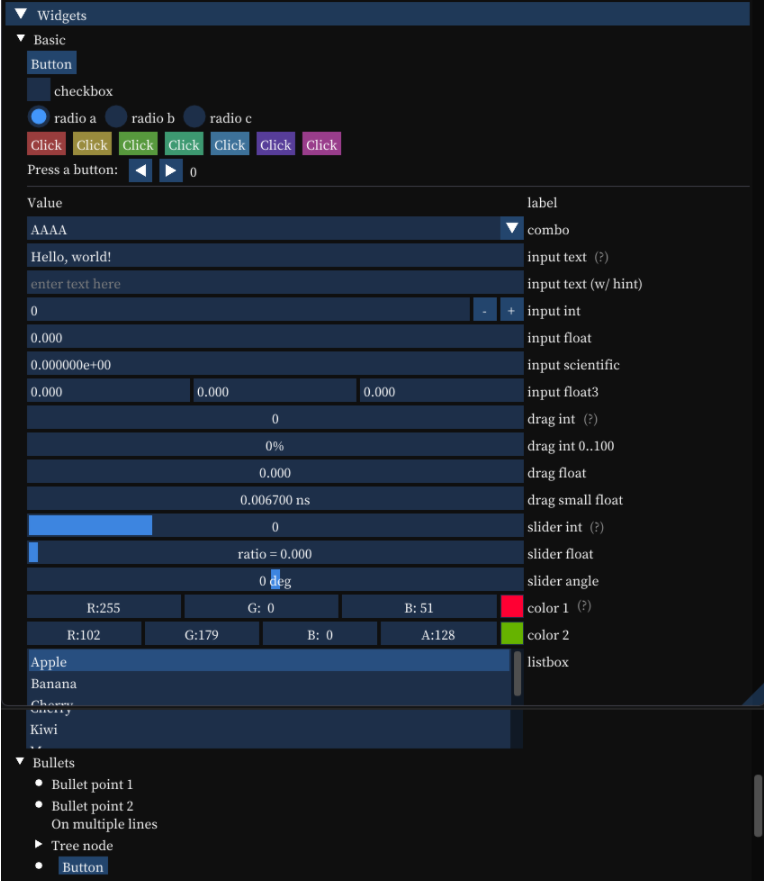
The below program example shows the program window and another window showing documentation using the Built-in documentation function
          from dearpygui.core import *set_main_window_size(800, 800)
show_about()
show_documentation()            # when running this code please look at the about window and it will report which version of Dear PyGUI is running
# Even if you just did a pip install please ensure you your environment is using the latest package
start_dearpygui()
Dear PyGui is made up of two modules dearpygui.core and dearpygui.simple.
dearpygui.core contains the base functionality of Dear PyGUI. Everything can be done with the core. This is the actual C extension module that the simple module is wrapping.
dearpygui.simple contains simple wrappers and other utilities created from the core to provide a more pleasant interface to Dear PyGui.
Developer Tools
Dear PyGui contains several very useful developer tools. The show_source() requires an input of a python file name to read.
          from dearpygui.core import *show_documentation()
show_debug()
show_about()
show_metrics()
show_source("main.py")  # replace "main.py" with your python file name
show_logger()            start_dearpygui()
Built-in Logging
One of the many powerful built-in developer tools is the Logger. This can be accessed through the command show_logger(). The logger has 6 log levels:
- Trace
- Debug
- Info
- Warning
- Error
- Off
The log commands can be filtered by setting the log level. The logger will filter out the set level and any levels lower than that level.
mvTRACE log level will show all the commands.
          from dearpygui.core import *show_logger()
set_log_level(mvTRACE)
log("trace message")
log_debug("debug message")
log_info("info message")
log_warning("warning message")
log_error("error message")            start_dearpygui()
Creating Widgets and Containers
Dear PyGui items can be broken down into :
- regular items (i.e. inputs, buttons)
- container items (ex. window, popup, tooltip, child)
- layout items (i.e. group, next_column)
Items are added with their respective add_*** commands.
Every item must have a unique name. By default, the name will become the label (if applicable). In the event that you would like to change the widget's label you may
- Place a "##" trailing the name (ex. "displayed_name##unique_part") anything after the "##" will be hidden from the displayed name.
- Use the label keyword which will display the label instead of the name for the item.
Some item names are auto-generated for items without name arguments in the function. (i.e. same_line). However, these have an optional name keyword that can be filled out if you need to reference the item at a later time.
          from dearpygui.core import *add_button("Apply")
add_same_line(spacing=10)
add_button("Apply##1")
add_same_line(spacing=10, name="sameline1")
add_button("Apply2", label="Apply")
add_spacing(count=5, name="spacing1")
add_button("Apply##3")            start_dearpygui()
dearpygui.simple context managers automate calling the end function and allows for code folding and shows a hierarchy in the code itself.
By default items are created in the order they are submitted.
However, items can be added out of order by specifying a parent container. Using the parent keyword will insert the widget at the end of the parent's child list. If you would like to insert it somewhere else, use before in combination with parent keyword to place the item before another item in the child list.
          from dearpygui.core import *
from dearpygui.simple import *add_text("First coded widget")
add_text("This is some text on window 2", parent="window 2")
# we can even specify the parent before it was coded
add_text("This is some text on child 1", parent="child 1")
# we can even specify the parent before it was coded
with window("window 1"):
# simple
              with child("child 1"):
# simple
              add_checkbox("Checkbox")
# this is a input item added inside of the child
add_checkbox("Last coded widget", parent="MainWindow", before="First coded widget")
add_checkbox("Last coded widget 2", parent="child 1", before="Checkbox")            # empty window
with window("window 3"): # simple
              pass            start_dearpygui()
Using Widgets
Every input widget has a value that can be set using the default_value keyword when being created or at runtime by the command set_value. To access the value of a widget we can use the command get_value. We can also pass the value of the widget directly to and from a python variable.
          from dearpygui.core import *my_var = True
add_checkbox("Radio Button", default_value=my_var)
print("Radio Button Value: ", get_value("Radio Button"))
print("my_var Value: ", my_var)            set_value("Radio Button", False)
print("Radio Button Value: ", get_value("Radio Button"))
print("my_var Value: ", my_var)            my_var = get_value("Radio Button")
print("Radio Button Value: ", get_value("Radio Button"))
print("my_var Value: ", my_var)            start_dearpygui()
Widget and Window Callbacks
Each input widget has a callback that is run when the widget is interacted with.
Callbacks are used to give functionality to widgets. Callbacks can either be assigned to the widget upon creation or after creation using set_item_callback() as shown in the code below.
Every callback applied to an item in Dear PyGui must take in a sender and data argument.
The sender argument is used by Dear PyGui to inform the callback which widget triggered the callback by sending the name.
The data argument is used by various standard callbacks to send additional data by specifying the callback callback_data.
Window type widgets have special callbacks that are triggered on events such as window resizing and window closing. The window specific callbacks can be applied to any window type widget. on_close will run the callback assigned to the keyword on window close and set_resize_callback() will run on every resize of the container and can be set to any specific window by using the handler keyword, the default is the "MainWindow"
If you would like a callback to run every frame, you can use set_render_callback()
          from dearpygui.core import *
from dearpygui.simple import *              def              close_me(sender, data):
              log_debug(f"{sender} window has been closed")                          def              render_me(sender, data):
              log_debug(f"window {sender} has ran a render callback")                          def              resize_me(sender, data):
              log_debug(f"window {sender} has ran a rezise callback")            show_logger()                                      # were going to use the logger to display callback replies
with window("Tester", on_close=close_me):          # simple
              add_text('resize this window resize callback will occur')
              add_text('close this window using the "x" button and a close callback will occur')            set_render_callback(render_me)
set_resize_callback(resize_me, handler="Tester")            start_dearpygui()
Run-time Adding & Deleting Widgets
With Dear PyGui you can dynamically add and delete any items at runtime. This can be done by using a callback to run the desired item's add_*** command and specifying the parent the item will belong to. By default, the widget will be added to the MainWindow if there is no parent specified.
By using the keyword before when adding an item you can control which item in the parent the new item will come before. The default will place the new widget at the end.
Value & Data Storage
When a new widget is added, a value is added to the value storage system. The identifier to this value is the name of the widget by default. You can override the identifier by using the source keyword. One of the benefits of doing this is to have multiple widgets control the same value.
Values are retrieved from the value system using get_value("source name").
Values can be changed manually using set_value("source name").
For widgets of different value types to use the same value in the storage system the larger value must be created first.
Remember you can store any python object in data storage even custom data types. Although we will only show a map being stored.
          from dearpygui.core import *              def              store_data(sender, data):
              custom_data = {
              "Radio Button": get_value("Radio Button"),
              "Checkbox": get_value("Checkbox"),
              "Text Input": dget_value("Text Input"),
              }
              add_data("stored_data", custom_data)                          def              print_data(sender, data):
              log_debug(get_data("stored_data"))            show_logger()
show_debug()
add_radio_button("Radio Button", items=["item1", "item2"])
add_checkbox("Checkbox")
add_input_text("Text Input")
add_button("Store Data", callback=store_data)
add_button("Print Data", callback=print_data)            start_dearpygui()
Menu Bar
A very important widget for GUI functionality is a Menu Bar. Menu bars are always displayed on the top of a window and have 3 main parts:
- The Menu Bar — The main menu ribbon
- Menus — Drop down menus "sub-menus"
- Menu Items — Items that can run callbacks (basically selectable)
Items are added to the Menu Bar from right to left. Items are added to the menus from top to bottom.
Menus can be nested as much as necessary. Any widget can be added to a menu.
          from dearpygui.core import *
from dearpygui.simple import *              def              print_me(sender, data):
              log_debug(f"Menu Item: {sender}")            show_logger()
with menu_bar("Main Menu Bar"):                    # simple                          with menu("File"):                             # simple                                  add_menu_item("Save", callback=print_me)
              add_menu_item("Save As", callback=print_me)                                  with menu("Settings"):                     # simple                                      add_menu_item("Setting 1", callback=print_me)
              add_menu_item("Setting 2", callback=print_me)                              add_menu_item("Help", callback=print_me)                              with menu("Widget Items"):                                  add_checkbox("Pick Me", callback=print_me)
              add_button("Press Me", callback=print_me)
              add_color_picker4("Color Me", callback=print_me)            start_dearpygui()
File and Directory Selector Dialogs
Directory dialogs are used by calling select_directory_dialog() which must be given a return callback. The return callback's data argument will be filled out with the directory path & folder path as a list of strings.
File dialogs are used by calling open_file_dialog() which must be given a return callback. The return callback's data argument will be filled out with the directory path & file path as a list of strings. Extensions are an optional keyword to the file dialog that will give selections to filter the displayed files in the dialog based on their extensions.
          from dearpygui.core import *              def              file_picker(sender, data):
              open_file_dialog(callback=apply_selected_file, extensions=".*,.py")                          def              apply_selected_file(sender, data):
              log_debug(data)  # so we can see what is inside of data
              directory = data[0]
              file = data[1]
              set_value("directory", directory)
              set_value("file", file)
              set_value("file_path", f"{directory}\\{file}")            show_logger()
add_button("Directory Selector", callback=file_picker)
add_text("Directory Path: ")
add_same_line()
add_label_text("##filedir", source="directory", color=[255, 0, 0])
add_text("File: ")
add_same_line()
add_label_text("##file", source="file", color=[255, 0, 0])
add_text("File Path: ")
add_same_line()
add_label_text("##filepath", source="file_path", color=[255, 0, 0])            start_dearpygui()
Plotting
Dear PyGui has simple plots and plots both of which have the ability to be dynamic.
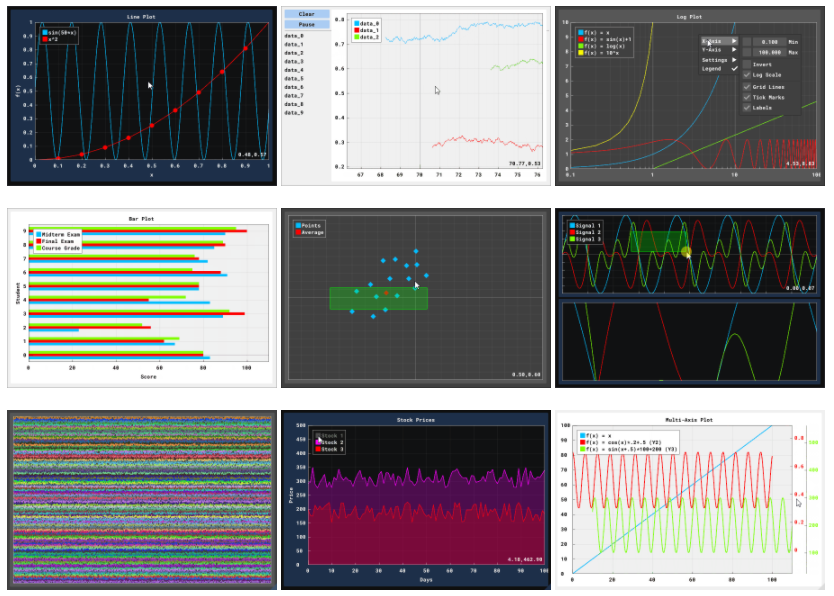
Simple plots take in a list and plot y-axis data against the number of items in the list. These can be line graphs or histograms.
Plots have much more functionality than simple plots. Plots use both the x and y coordinates. Plots must be created using add_plot() command and then the data can bee added as either a line series or a scatter series. Features of plots are:
- Click & Drag: to pan the plot
- Click & Drag on Axis: to pan the plot in one direction
- Double Click: scales plot to data
- Right Click & Drag: to zoom to an area
- Double Right Click: opens settings
- Shift + Right Click & Drag: to zoom to an area that fills a current axis
- Scroll Mouse Wheel: zooms
- Scroll Mouse Wheel on Axis: zooms only that axis
- Toggle data sets on the legend to hide them
Simple plots can be made dynamic by changing the value of the plot call with set_value().
Plots also can be dynamic. The dynamic function can be applied as easy as clearing the plot and adding new data using a callback such as to render or item's callback. set_value().
          from dearpygui.core import *
from math import cos              def              plot_callback(sender, data):
              # keeping track of frames
              frame_count = get_data("frame_count")
              frame_count += 1
              add_data("frame_count", frame_count)                          # updating plot data
              plot_data = get_data("plot_data")
              if len(plot_data) > 2000:
              frame_count = 0
              plot_data.clear()
              plot_data.append([3.14 * frame_count / 180, cos(3 * 3.14 * frame_count / 180)])
              add_data("plot_data", plot_data)                          # plotting new data
              clear_plot("Plot")
              add_line_series("Plot", "Cos", plot_data, weight=2)            add_plot("Plot", height=-1)
add_data("plot_data", [])
add_data("frame_count", 0)
set_render_callback(plot_callback)            start_dearpygui()

Drawing/Canvas
Dear PyGui has a low-level drawing API that is well suited for primitive drawing, custom widgets, or even dynamic drawings.
The drawing is started by calling add_drawing() then items can be added by calling their respective draw commands. The origin of the canvas is in the bottom left.
Drawings have a scale, origin, and size that can all be accessed and set. The scale is a multiplier of the items x and y values. The size is in pixels.
Drawings can display images of types ".png", ".jpg", or ".bmp". Images are drawn using draw_image()
Although drawings can be made dynamic by clearing and redrawing the entire thing a more efficient method is offered.
To make a drawing dynamic we should use the tag keyword to tag the items we would like to redraw. Then simply call a draw command using the same tag. This will delete only that one item and redraw it with the new command.
          from dearpygui.core import *              def              on_render(sender, data):
              counter = get_data("counter")
              counter += 1
              modifier = get_data("modifier")
              if counter < 300:
              modifier += 1
              elif counter < 600:
              modifier -= 1
              else:
              counter = 0
              modifier = 2                          xpos = 15 + modifier*1.25
              ypos = 15 + modifier*1.25
              color1 = 255 - modifier*.8
              color3 = 255 - modifier*.3
              color2 = 255 - modifier*.8
              radius = 15 + modifier/2
              segments = round(35-modifier/10)
              draw_circle("Drawing_1", [xpos, ypos], radius, [color1, color3, color2, 255], segments, tag="circle##dynamic")
              add_data("counter", counter)
              add_data("modifier", modifier)            add_data("counter", 0)
add_data("modifier", 2)
add_drawing("Drawing_1", width=700, height=700)
set_render_callback(on_render)            start_dearpygui()
Delta Time and Internal Clock
Dear PyGui has a built-in clock for checking the total run time get_total_time() which returns total run time in seconds
Also using the command get_delta_time() we can check the time in between rendering frames in seconds.
          from dearpygui.core import *              def              on_render(sender, data):
              delta_time = str(round(get_delta_time(), 4))
              total_time = str(round(get_total_time(), 4))
              set_value("delta_time", delta_time)
              set_value("total_time", total_time)            add_text("Total Time: ")
add_same_line()
add_label_text("##total_time_text", source="total_time")
add_text("Delta Time: ")
add_same_line()
add_label_text("##delta_time_text", source="delta_time")
set_render_callback(callback=on_render)            start_dearpygui()
Tables
Dear PyGui has a simple table API that is well suited for static and dynamic tables.

The table widget is started by calling add_table().
To edit the table widget we can use the methods add_row() add_column() which will append the row/column to the last slot in the table.
Alternatively, we can insert rows/columns using insert_row() insert_column(). Columns and Rows are inserted according to their index argument. If the specified index already exists the exiting columns/rows will be bumped and the new row/column will be inserted at the specified index.
Also, an added or inserted row/column will by default fill unspecified cells with empty cells.
Additionally, headers and cells can be renamed and their values are changed.
Tables cells are selectable. This means that we can apply a callback to the table and retrieve which cell was selected through the sender and even get the text inside the cell.
          from dearpygui.core import *              def              table_printer(sender, data):
              log_debug(f"Table Called: {sender}")
              coord_list = get_table_selections("Table Example")
              log_debug(f"Selected Cells (coordinates): {coord_list}")
              names = []
              for coordinates in coord_list:
              names.append(get_table_item("Table Example", coordinates[0], coordinates[1]))
              log_debug(names)            show_logger()
add_table("Table Example", ["Header 0", "Header 1"], callback=table_printer)
add_row("Table Example", ["awesome row", "text"])
add_row("Table Example", ["super unique", "unique text"])
add_column("Table Example", "Header 3", ["text from column", "text from column"])
add_row("Table Example", ["boring row"])            start_dearpygui()
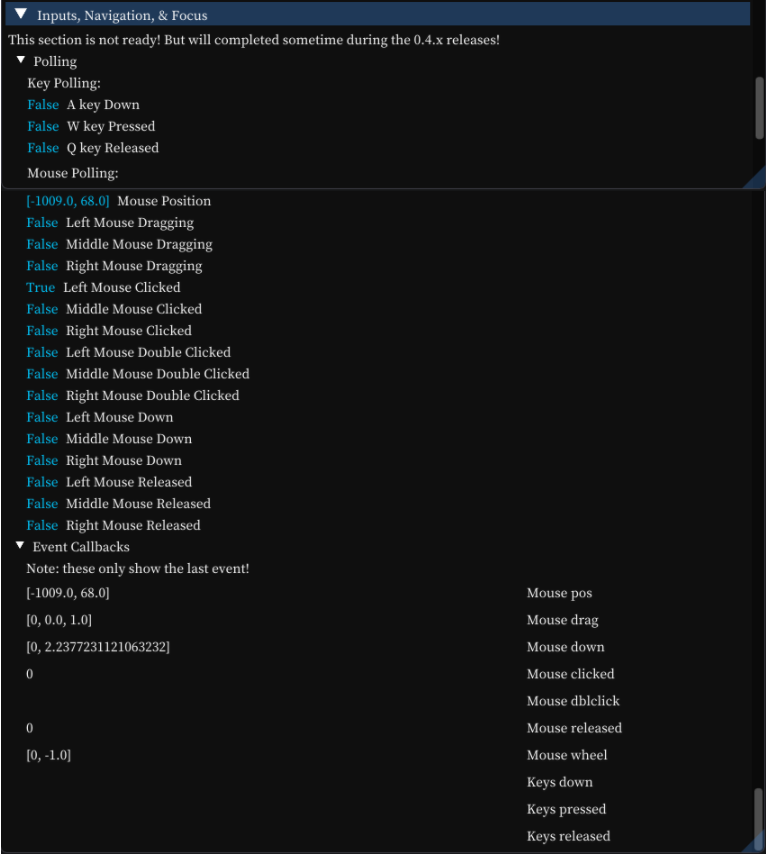
Input Polling
Input Polling in Dear PyGui is done by calling the desired poll command within a function. The function must be set to a windows render callback for polling to occur when that window is active. Because the render callbacks are run every frame Dear PyGui can poll between frames if a specified input is performed.
A list of all the polling is as follows:
- get_mouse_drag_delta()
- get_mouse_pos()
- is_key_down()
- is_key_pressed()
- is_key_released()
- is_mouse_button_clicked()
- is_mouse_button_double_clicked()
- is_mouse_button_down()
- is_mouse_button_dragging()
- is_mouse_button_released()
- set_key_down_callback()
- set_key_press_callback()
- set_key_release_callback()
- set_mouse_click_callback()
- set_mouse_double_click_callback()
- set_mouse_down_callback()
- set_mouse_drag_callback()
- set_mouse_wheel_callback()
- set_render_callback()
- set_resize_callback()
For information about a specific command see the API Reference.
It is possible to combine as many polls as necessary to achieve the desired functionality.
          from dearpygui.core import *              def              main_callback(sender, data):
              set_value("Mouse Position", str(get_mouse_pos()))                          if is_key_down(mvKey_A):
              set_value("A key Down", "True")
              else:
              set_value("A key Down", "False")                          if is_key_pressed(mvKey_A):
              set_value("A key Pressed", "True")
              else:
              set_value("A key Pressed", "False")                          if is_key_released(mvKey_A):
              set_value("A key Released", "True")
              else:
              set_value("A key Released", "False")                          if is_mouse_button_dragging(mvMouseButton_Left, 10):
              set_value("Left Mouse Dragging", "True")
              else:
              set_value("Left Mouse Dragging", "False")                          if is_mouse_button_clicked(mvMouseButton_Left):
              set_value("Left Mouse Clicked", "True")
              else:
              set_value("Left Mouse Clicked", "False")                          if is_mouse_button_double_clicked(mvMouseButton_Left):
              set_value("Left Mouse Double Clicked", "True")
              else:
              set_value("Left Mouse Double Clicked", "False")                          if is_key_down(mvKey_Shift) and is_mouse_button_clicked(mvMouseButton_Left):
              set_value("Shift + Left Mouse Clicked", "True")
              else:
              set_value("Shift + Left Mouse Clicked", "False")            add_label_text("A key Down", value="False", color=[0, 200, 255])
add_label_text("A key Pressed", value="False", color=[0, 200, 255])
add_label_text("A key Released", value="False", color=[0, 200, 255])
add_spacing()
add_label_text("Mouse Position", value="(0,0)", color=[0, 200, 255])
add_label_text("Left Mouse Clicked", value="False", color=[0, 200, 255])
add_label_text("Left Mouse Dragging", value="False", color=[0, 200, 255])
add_label_text("Left Mouse Double Clicked", value="False", color=[0, 200, 255])
add_label_text("Shift + Left Mouse Clicked", value="False", color=[0, 200, 255])            set_render_callback(main_callback)            start_dearpygui()
Multithreading & Asynchronous Functions
For calculations and callbacks that require extended time, it can be useful to implement asynchronous functions or functions ran on separate threads. To do this simply call run_async_function().
It is important to note that functions ran with the async command cannot call any other Dear PyGui API calls.
Asynchronous functions cannot access add_data() or get_data(). So when it is necessary to pass data to the asynchronous function you must use the data and return handler keyworded arguments. Any Python object can be made accessible to the async function by being sent into the function through the "data" keyword. Additionally, any returned data from the Async function will be accessible through the "data" input of the specified return callback.
          from dearpygui.core import *
from time import sleep              def              long_async_preparer(data, sender):
              floaty = get_value("Async Input Data")
              run_async_function(long_callback, floaty, return_handler=long_async_return)                          def              long_callback(sender, data):
              sleep(3)
              return data * 2                          def              long_async_return(sender, data):
              log_debug(data)                          def              long_callback2(sender, data):
              sleep(3)
              log_debug(data * 2)            show_logger()
add_text(
              "input a number and see the logger window for the output of the long callback that would normally freeze the GUI")
add_input_float("Async Input Data", default_value=1.0)
add_button("long Function", callback=long_callback2, callback_data=get_value("Async Input Data"), tip="This is the long callback that will freeze the gui")
add_button("long Asynchronous Function", callback=long_async_preparer, tip="this will not a freeze the GUI")            start_dearpygui()
When the asynchronous function method is called a thread pool is created. The aspects of the thread pool that can be configured are the number of threads and the timeout time.
using set_thread_count() we can set the number of threads in the thread pool. Also, we can use set_threadpool_high_performance() to tell the thread pool to max out the number of threads per the user's computer. Be aware that this will run the CPU at 100% when calling async functions.
Setting the timeout time for the thread pool can be done using set_threadpool_timeout(). This will destroy the thread pool and free the resources after the set amount of time.
Themes and Styles
Themes and widget styling can be applied to a single widget or the app as a whole. Some examples of attributes of the style that can be set are:
- font size
- app color scheme
- corner roundness
how to create circle dinamically on canvas python with mouse
Source: https://medium.datadriveninvestor.com/create-quick-and-powerful-guis-using-dear-pygui-in-python-713cc138bf5a
Posted by: heatonaned1998.blogspot.com
0 Response to "how to create circle dinamically on canvas python with mouse"
Post a Comment